Yoga

Monday, November 28, 2011

Journey on a pie crust... Gluten free pumpkin fluff mini pies!

How delicious does this look?!

OK, so I have been too afraid to embark on a gluten free pie baking journey through out the year. There it is, I admitted it. I was too afraid to get all excited about a delicious pie and have the crust turn out, well, totally gross. 

David and I decided to do our Gratitude Day (Thanksgiving) here at home together with our sweet lil P. We are truly amazed by our family and thought it would be fun to cook up a storm for just the three of us (the girls are with their biological mom this year). In my view, Thanksgiving is just not Thanksgiving with out PIE (or casseroles for that matter). So I mustered up my baking courage and waited till the last minute went for it. 

Well, I went a little crazy with the pie crust. Um, maybe a lot crazy. I started with the intention of pecan (pee-can) pie- southern tradition baby! Then the thoughts, ideas and inspiration took off and I would not stop mixing, kneading, and rolling out gluten free pie crust dough.


GF Pie Crust:

1 C + 2 Tablespoons GF Pastry Flour Mix
2 Tablespoons Sweet rice flour
1 Tablespoon Sugar
1/2 teaspoon xanthan gum
1/4 teaspoon salt
6 Tablespoons Spectrum palm oil Shortening (or butter)
1 egg
2 teaspoons apple cider vinegar
1.5 teaspoons vanilla

mix dry ingredients. cut in shortening and blend until the flour looks like corse meal. add egg and vinegar and vanilla, if you're making a sweet pie. mix on low until ball forms. plop dough ball on wax paper, then place another piece on top and roll out. I use a wine bottle :) grease 9" pie pan/dish peel off top piece of wax paper, turn bottom sheet upside down to transfer dough to pan. Pinch edges and cook according to pie recipe. If you need a precooked pie crust ***check recipe first! then prick the bottom of the dough several times and bake at 375 degrees for 25 minutes.


I made it with: 
1. orange juice to sub for ACV  
2. vanilla sweet pies


So what did I put in them? 

Well, this is what went in the vanilla one. My mother always had this pumpkin fluff pie recipe, which I forgot but reinvented. 

1 can organic pumpkin pie filling
1/2 container of cool whip
1 pie crust
1 pecan on top


that's it. so simple.


Thursday, November 24, 2011

GF Pastry Flour Mix -for gluten free baked goods

Get out your measuring cups, it's flour mixing time!

GF Pastry Flour Mix:
2 C brown rice flour
2/3 C potato starch (kinda hard to find, but you can buy it on Amazon)
1/3 C tapioca flour

Mix them in a jar and shake, shake, shake!!!

I use all Bob's Red Mill flours, they're here in Portland :)

Gluten is a binding agent, it is what holds baked goods together when made with wheat (and white) flour. In gluten free baking, there is no binding agent- the gluten. So we use xanthan gum. Each recipe will call for a different amount since we want certain baked good to be tighter than others. I stay clear of the all purpose gluten free flours that have xanthan gum already in them. The ones I have tried have tasted funny and I never really know what I am going to get for a final product. This mix is tried and true! I have used this to adapt many recipes and test out about how much xanthan gum to use.

Sunday, November 13, 2011

DIY A Fall Wreath- Tutorial


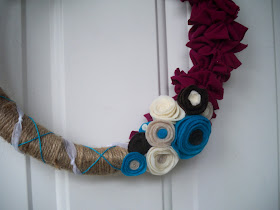
Here is my front door!  I have been so inspired by these fall wreaths that I have been seeing on Pinterest!  I decided that I should give it a whirl, even though I thought (past tense) wreaths were just for old people. :P Sorry, mom.  There are so many other tutorials on the net, but I did not want to buy anything new.  Well, other than the wreath form.  I started with a wicker form from The Dollar Tree.  Yes, $1 for a wreath form, can't beat that with a stick!  I should tell you that I was inspired by this wreath.

(Step 1) I wrapped my wicker wreath form in jute twine that I had left over from our wedding favor bags.  I wrapped and wrapped and wrapped until I got tired of wrapping it and then I had another idea.  Ruffles!

(Step 2) I had an old tshirt that was a beautiful cranberry color.  I was going to donate it, but decided it is free fabric for my stash and I'd better hang onto it. Glad I did! I cut the shirt into strips, sewed down the center of the strips and to my amazement it ruffled by itself!  If your tshirt strips do not ruffle, you'll simply pull on the ends of the threat to gather the fabric up.  No need to finish the edges of the strips as they won't fray.


(Step 3) Bust out the hot glue gun!  I chose which side I wanted to be the back of my wreath, made sure my jute twine was secured to the form and wrapped my ruffles around the front of the wreath and secured them in the back with hot glue.  I made 15 ruffles and attached 11.  Id suggest making a couple/few extra since the seams popped out of a couple of mine and I didn't want to run back and forth to the sewing machine.


(Step 3) Pick out felt colors for flowers and scavenge string and ribbon stash for coordinating colors.  From the tutorial linked above, I loved the texture of the white yarn that is wrapped around her wreath, but as I'd noted above I didn't want to buy anything new, I raided our ribbon stash and found white ribbon that I thought was too thick and then tied evenly spaced knots in it to created the texture that I was seeking.  I love turquoise and found some thread in my bonus daughters' craft stash (thanks A & B)!  I wound the string around in one angled direction all the way around the wreath and then came back the other way with it angled in the opposite direction.  The turquoise string basically made x's all around the wreath.  See photo below:


(Step 4) I wound my knotted white ribbon around the wreath, crossing the form (on the front side of the wreath) in between the turquoise x's.

(Step 5) This part is soooooooo fun- make felt flowers!  This is a link to a great tutorial on making felt flowers- it'll hook ya, watch out!

(Step 6) Hot glue flowers to the wreath.  I chose 2 clusters similar to the inspiration wreath (linked up above), but really you can do them however you like.

(Step 7) I looped a piece of white ribbon through the top of my wreath and hung it on the wreath hook that I got from Home Depot for only about $2.50.  

Since I already had just about everything to make this wreath in my crafting stash, this project only cost me about $3.50!!  
As always, feel free to contact me with questions or for tips or tricks! 


Friday, November 11, 2011

DIY Weekly dry erase meal planner board and broken computer

So, my computer broke. A very sad time right now, we have been together for 8 years, she made the move with me to Portland. I was very attached to my little PowerBook g4! So here I am, back from hiding and posting crappy photos (from my iPad) of a cute project! Lol This will just have to do until I either get a new computer or the camera adaptor for my iPad.

I went to The Rebuilding Center on Mississippi and scoured the old windows. I found this one and decided it was "the one" - I figured that a black frame would be a little too dramatic for this piece since the paper in the back has so much black in it.

(Step 1) So using packaging paper to cover the glass and painters' tape my dear husband covered the front of the glass and one a day when it actually wasn't raining here in Portland, I spray painted the frame with a matte metallic silver.
(Step 2) I cut my decorative paper to size by inserting it behind the glass and using and exacto knife around the edges of the paper for precision.
(Step 3) I punched 7 circles out from a complimentary paper using my Fiskars circle hole punch, then spread Mod Podge on the back of each circle and evenly spaced them out on my decorative paper- using a ruler.
(Step 4) I could have stamped my letters in to the circles or even cut them out with the Cricut, but I found these stickers last week in my scrapbook stash and decided that a. I was feeling lazy and b. These would be really cute with the design of the decorative paper that I chose. So I chose the lowercase letters, peeled them off and stuck them in the middle of the circles. In our house the week starts with Monday and ends on Sunday, so I ran with that.
(Step 5) I cleaned the glass really well with my homemade glass cleaner and used a microfiber towel to remove all excess lint.
(Step 6) I slathered Mod Podge on the back (unpainted frame) side of my window glass and very carefully and slowly adhered my decorative paper face down in the Mod Podge. I let it dry and...
(Step 7) I applied Mod Podge on the back of the decorative paper to protect the paper. If you wanted, after the Mod Podge dries you could seal it with clear acrylic sealer, but I didn't feel it was necessary.
(Step 8) We attached 2 sawtooth picture hangers on the back to hang it and balance it out when we write on/erase it!

What I'd do differently next time:
Less or lighter color pattern on the decorative paper so we could read the meals better.
Overall, I LOVE how it turned out. I am an instant gratification crafter and this met all of my expectations and time constraints!!

Happy crafting! If you make one, please send me a picture, I'd love to see what you come up with!!

 What is your meal planning process, tips or tricks?