Yoga

Friday, April 27, 2012

Burlap Covered Diaper Boxes


**There are tons of photos in this post, consider yourself warned!**

We cloth diaper, except at night and on days where we are really lazy- about one day a month.
With that said, we have bought maybe 6 boxes of diapers total. Why? Well, they are expensive and toxic. If you don't know the details on how awful disposable diapers are you should look them up. 

I am not here to rant and rave, I am here to tell you about how I am reusing my disposable diaper boxes since the diapers themselves are so wasteful.

If you look here and here you will see the inspiration for my girls' room. This is another low cost project to promote their organization while they live with us full time over the summer! They also helped make them :)

What you will need:
Cardboard (diaper) box
burlap
spray paint
cheap wooden picture frame from Craft store
thin wood to cut (or cardboard might even work!)
E6000 (the best craft glue ever!)
scissors
spray glue
chalkboard spray paint


I primed my boxes.

Here is where I would do it differently if I did it again...
I would spray paint my boxes brown first, since the primer and Luvs label showed through after I adhered the burlap. Which I ended up "fixing" by spray painting the whole box and burlap a nutmeg brown after they were covered...


Awful photo above, sorry, but it was the only one I had of the process :)

Cut your burlap to cover the box and spray the whole box with spray adhesive outside! That stuff is a sticky mess, but it works. I wore gloves, that stuff is sooooo hard to get off of your hands.

Once my box was covered, I spray painted them nutmeg color- and I don't have a photo of this step.

I spray painted a $1 wooden frame blue. 

Happy Hubby used the cardboard insert of this cheap Michaels wooden frame as a template to cut out this thin wood to fit in the frame. I primed it with spray primer and then 2 coats of chalkboard paint.


I glued the frame in with this:


Then glued the frames onto the burlap covered boxes with the same glue and put them face down with heavy books inside of the box to make sure the frames stuck.


Happy Hubby added eyelets to the sides which I intend to add braided jute handles to.


And they fit perfectly on our shelves in the girls' room.


All that is left is to write in chalk what we keep in the boxes and add handles!

Great way to up cycle! 


Thursday, April 26, 2012

Dictionary Art

Brought to you by the letter:


Isn't that P awesome?!?!

I got a paper mache P from Joann on sale a couple weeks ago.

In this post I talked about the gallery wall that I am working on in Mr. P's room. 

My vision is letters and numbers, and keeping things pretty classic. 
I love things that are timeless, that way we are not wasting and tossing etc.

I kinda feel guilty for ripping up a dictionary since I just read the other day that no more will be published due to the availability of definitions on the world wide web... Sad!

But I ripped it up anyway... and then lamented that I should have made copies to use instead, and then I thought, well, this is a great way to preserve history right?!  See my dilemma here? :)

Anyhow, the P is covered in ripped up dictionary pages of all P words and will make a lovely addition to Mr. P's room/gallery wall.

I also made this cute little guy:


My lil man is soooooo into bike rides these days!

This is a little 4x4 canvas that I adhered a dictionary page with the word bicycle onto and used my radical bicycle stamp.
I might be able to sell these, what do you think?

Here they are side by side:


I can not wait to get them up on the wall.

Katie from Creatively Living has certainly inspired me with her lovely gallery walls in her home. You should check em out! However making the decision where to hang everything is pretty overwhelming!

We will have it up soon, and photos to brag inspire :P


Wednesday, April 25, 2012

I Scored! Pyrex Story

I thought the possibility of finding vintage pyrex at Goodwill was slim-to-none. Seriously, I thought that was the first thing everyone looked for when they went thrifting...

I wasn't even looking for Pyrex, I was looking at plates and mugs. We don't really need either but I sort of have an obsession with dishes... especially old ones with lotsa character!

Out of habit, I went down the isle in Goodwill where there *might* be Pyrex...

And look what I found!!!!!


Disclaimer:
They did not look this amazing when I found them. 

The orange bowl with yellow flowers looked peach with white flowers...
yeah, it that bad.


I Started cleaning with soapy water. That didn't work at all. 

You really don't want to use an abrasive on this stuff since it can mess up the finish, but in order to get them clean I had to use Bar Keepers' friend as a last resort. It took quite a bit of the shine off of the orange bowl, it looks pretty matte now. Although, it was so grungy in the first place, it may have already had the shine scrubbed out! I was able to clean my pink dish with a sponge and magic eraser in only some parts. Since that too is an abrasive, I wanted to clean as much as I could with out ruining the finish.

Here they sit atop our room divider... Right next to buddha!


I'm pretty thrilled by this find!

$6.99/piece, can't beat that with a stick!


Tuesday, April 24, 2012

Crock Pot "baby food"- apples and sweet potatoes


This is a favorite in our home. All three kids will mow through a batch of this in no time, and it's so simple. I got tired of making a huge pot on the stove so now we crock pot it.

What you'll need:
Apples
Sweet Potatoes
Lemon or lemon juice
Cinnamon

Peel and cut up sweet potatoes and apples. 

Place sweet potatoes on the bottom of your crock then apples on top- since apples make a lot of their own water.

Add water to the crock. I added just enough to cover half of my apples and sweet potatoes.

Cook for 4-6 hours on low. 

Sweet potatoes should be tender, but not mushy. 
It should look about like this:


Toss apples, sweet potatoes, and water from the crock in the blender (or food processor, but blender holds more). 

Add a squeeze of lemon juice- it's about 1/4 medium lemon's juice for 1/2 a crock's worth. Make sense?

Add a few dashes of cinnamon and blend away! I never really measure anything...

It'll look like this:


And there you have it.

I have a feeling my children will be eating this all the way through college. 

Seriously, they like it that much.


The babes will snack on just the apple flavored sweet potatoes from the crock pot.

In this post I wrote about baby carrots in the crock as snacks. 

You can do carrots in this recipe as well instead of sweet potatoes. In which case I like to add a little ginger.

The other cool thing about this mixture is that it makes a great addition to pancakes or baked oatmeal!
That'll have to be a whole other blog though!

Happy Crock Potting!


Monday, April 16, 2012

This stinky desk...

This desk stinks. I'm serious. This desk smells so bad that it makes me gag... 

That is why I have been putting off doing something to it.


But it's time.


This stinky desk is getting a makeover!


Friday, April 13, 2012

Wine bottle to vase! A quick project tutorial

I am going to tell you how to turn a wine bottle into a vase!


Remember this post
There was really just a smattering of color in the form of fabric and fake flowers that were inspiring me for A & B's bedroom. Whimsical really.

I could not pass up these huge daisies at Michaels at 50% off a couple of weeks ago, but we needed a vase and I really did not want to buy anything. I already hadn't purchased enough fabric with my coupon stash and had to go back to buy more for a measly 10% off. 

I do not like buying things that are not on sale. I think I inherited that from my father...

Ok, on to the tut.

So simple:

1. Raid your recycling (or someone else's!) and select a bottle.

2. Soak it in hot water to scrape curse peel the label off.

3. To get the excess gunk off from the label you can use goo gone, vegetable oil,
 or rubbing alcohol and some salt is a great little abrasive.

4. Wash the bottle very well with dish soap. 

5. Let your bottle dry all the way. 
I waited a whole day, and I lived to tell about it ;) 

6. Spray primer! 
Cover the whole bottle.

7. After your primer has dried (usually about 20 mins or so), 
spray paint your bottle your chosen color. 
In our case it is white.

8. This is the most important part: 
Put your bottle someplace safe and relatively warm and let the paint cure for at least a week
This will keep your paint from chipping, peeling or cracking.


**If you choose to add huge whimsical flowers, set them up in varying heights, as seen in the photo, and trim the stems with burley wire cutters. You may have to twist them slightly to get them into the bottle.


Thursday, April 12, 2012

PaPaBAW!! (pom pom balls) toddler activity!

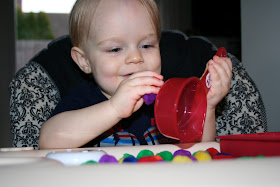
PaPaBAW!! (pom pom balls) Mr. P yells this every time that I get the pom pom balls out. I keep them in a jar and let him stick his hand into the full jar (sensory!) and pull them out. 

Keeping Mr. P in the high chair for this activity helps to contain the balls and maintain his focus. 

I love this activity, because it lasts awhile, it is educational, it's super cheap, and it doesn't have to be directly supervised if you need to buy some chore time!

As you see here, we get out multiple kitchen containers for lil man to practice sorting and use his imagination!


We are teaching him to sort by color in the silicone ice cube tray.


Just look at this concentration caught on camera!


he really loves this activity. It is fun to watch him make up different things to do, sometimes we inspire him and other times we leave him alone to create.


We purchased this pack of primary color pom poms at the Dollar store! We also got a pack of pastels to mix it up. 

Eventually we can start talking about comparisons and what colors combine to create other colors!


And sometimes the measuring cup just becomes a telephone!

**Please note that if you toddler likes to stick things in their mouth this may not be the best activity for them unless highly supervised. Mr P is not big on putting everything in his mouth, but he just had to try it once. We watched very closely as he tested one in his mouth and spit it back out- quickly! It only took one time!

If you think of any other pom pom games/activities, please let me know! These things are so versatile!


Wednesday, April 11, 2012

DIY Photo canvas for gallery wall

So, I'm hopping on the trendy scene with home decor. The gallery wall... I am working on two at the moment (since we all know that I am self diagnosed D.I.Y- A.D.D), one in my entry way and one in Mr. P's room.

Guess what?!
 Canvases were on sale last week at Joann's- 50% off! I live for this time of year. Honestly, I refuse to purchase a canvas if it is not on sale. I bought a lot of them... 

I just adore how a photo looks on a canvas and I have been known to purchase the Groupon for 60% off said canvas photo mounting. Enter Pinterest to save the day... again!

I found this tutorial (which rocks!) and I decided to do what I do and make it my own.

1. I took baby photos of Mr. P and adhered them to canvas (that I'd painted black brown- top and all 4 sides) with Matte Mod Podge- my fav.

2. I patiently waited for them to dry... about 20 minutes.

3. I covered the top of the photo with smooth horizontal strokes of Mod Podge. The smooth strokes with a paint brush, not sponge are sooo important, in the end you will see the strokes, but they make your photo look like part of the canvas.

4. Again, waiting for it to dry...

5. Fill in the creases between the photo and canvas, around the rim of the photo, you'll end up painting it. Then smooth vertical strokes of Mod Podge across the top (of the horizontal strokes) of the photo.

6. More waiting for it to dry...

7. one last coat of Mod Podge on top of the photo, again smooth horizontal strokes.

8. Waiting for dry....

9. Repaint the edges of the canvas black brown and stipple a bit onto the front rim of the photo- you can see it better on the smaller, lighter photo below.

10. Wait for it to dry.

11. Spray the whole thing with clear flat (unless you like a little shine, then use satin...), acrylic spray paint- I used Krylon!

And, a little side view!


Tuesday, April 10, 2012

Kale Flowers

Did you know that you can eat the flowers from Kale?! 

We planted some organic kale in our garden last year and it was amazing. It kept growing and growing. We finally got out into the yard this past (sunny!) weekend and got some work done, which included chopping down the kale that was starting to take over. As I was trimming all of the leaves off, I noticed that the buds and flowers on the tips of the kale looked an awful lot like broccoli rabe. I decided to trim off these pieces as well, separating them from the leaves. 

We washed them, then boiled them for only a couple minutes so that they were still a little crisp. I then tossed a little minced garlic in the frying pan with some olive oil and added my flowers and buds. O.M.Goodness! 


They were so sweet and tender as well as crisp. They were so fresh and delightful that Happy Hubby and I almost fought over the last bite! 

I wish we had more.... 

When we see flowering kale in the neighborhood these days, we're pretty tempted to snatch it! I don't think folks know what a treat these are!


Thursday, April 5, 2012

Crock pot baby (food) carrots!


 Did you know you can make baby food in the crock pot?

I wish I'd discovered this a lot sooner, life would have been way less complicated! However I am utilizing  this technique now. We received this "little dipper" crock pot with our large one as a wedding gift. It only has one setting, which is warm.
I had no idea what to do with it and even looked up recipes online, but everything was for dips. I decided that I'd try a sweet potato in it one day to see if I could make veggies for P, I figured if it didn't work I could just dump it into a pot and boil it. Well, after about 4 hours, my sweet potato was cooked!!

Mr. P is really into feeding himself these days, which is great since I can get things accomplished around the house while he eats. Chips and other carb loaded foods are most of the finger foods. Then it dawned on my, what about cooked carrots?!


So, I filled the little dipper with carrots and topped it off with water, and let it cook for 6 hours.

I then unplugged the little dipper and dumped the water out, allowing the carrots to cool. I then dumped them into a ziploc and threw them into thew fridge.


I gave lil man a small bowl of hummus to dip his carrots in...
What does Mr P think?


He loves them!


The best part is, the carrots are not smushy and falling apart. The even better part is that they are soft enough that he couldn't choke on them, and could potentially be smashed up for baby food!